
“The secret of good teaching is to regard the child’s intelligence as a fertile field in which seeds may be sown, to grow under the heat of flaming imagination.”
— Maria Montessori
Hello! I’m Maureen Harris and the other person you will meet in this blog post is my daughter Leah. We have both been involved with Montessori for most of our lives and have had so much fun creating music webinars for the AMS Learning library of on-demand videos. This is a series of 3 blog posts beginning with “Master your First Song,” where you learned the basics of music and song. The second post explored “Rhythm & Beat” and the world of percussion instruments both non-pitched and pitched, all while making your own musical instrument. The final post in this series is called “Do you know your Do, Re, Mi?” and will introduce solfege and the beautiful Montessori bells. The age level for these lessons is Early Childhood.
The Montessori environment is arranged to accommodate the natural functions of childhood learning through the freedom of movement and activity. The wide array of music and movement opportunities for the child supports this style of learning and provides the freedom to act in accordance with their innate musical tendencies. Initially, the child is introduced to quality music and a repertoire of songs to sing is learned and developed for later building of musical techniques.
Quick Study: Do, Re, Mi (Body Movement)
To get us started Leah and I will discuss the extremes of ascending and descending pitches through kinesthetic body movements.
- Song Tips for Do, Re, Mi (1:22)
- Do, Re, Mi Song (25 seconds)
- Do, Re, Mi Song with Body Movements (34 seconds)
What a simple ice breaker song and so easy to learn. Now, we are going to explore solfege, how to match pitch by using hand signs which represent each note in a musical scale, and how to introduce the Montessori sensorial bells to your students.
The Do, Re, Mi Song
The Do, Re, Mi song that you just saw on video is a visual representation of the ascending notes—from knees to tummy to head, and descending from head to tummy to knees. The corresponding hand signs are also displayed in the video. It is important to remember that the fist for Do is placed at “belly button” or naval level. You then use ascending hand signs from there as the pitches get higher. We are starting with the first three notes which are pitched to match the first three of the set of sensorial bells.
- Do, Re, Mi Song Tips (41 seconds)
- Do, Re, Mi (Solfege) Song Tips (44 seconds)
Let’s see if we remember the solfege that was learned for Do, Re, Mi, starting with a fist at tummy level and moving up to re, mi. This corresponds beautifully with Hot Cross Buns, which some of you may have already realized is the reverse of Do, Re, Mi pitches and would therefore be the opposite for the Do, Re, Mi solfege signs.
This time let’s start with Mi. Your fist, arm, and elbow, are all positioned horizontally at face level. Then, slowly drop the elbow for Re and then bring the fist down to the tummy level for Do.
Pitched Instruments
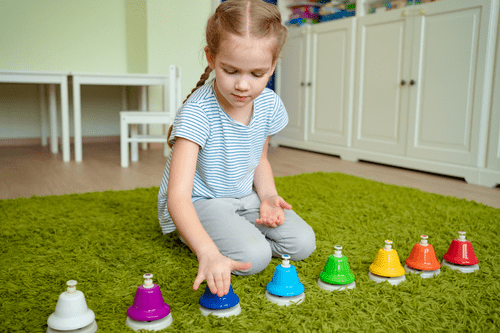
Beginning with the sound cylinders which are used for shaking and matching, and grading and conveying musical dynamics, and on to the stunning Montessori bells, Maria Montessori created one of the most beautiful of all Montessori materials. The beautiful shiny bells produce the brightest clear tone, isolate the concept of pitch, and fascinate the children’s curiosity.
Using the Montessori didactic materials, the child learns to recognize similarities and differences, to discriminate between similar objects, and to grade similar objects. The musical qualities discriminated with the visual sense are size, shape, and color; with the auditory sense, discrimination is based upon intensity and pitch.
Bell Material Terminology
- Bell
- Mallet (the object used to strike the bell—a firm rubber mallet head produces a pure sound)
- Damper (the object used to stop the tone of the bell)
The child is to stand while playing the bells in order to keep the arm parallel to the floor while striking the bells. The educator may need to kneel when first presenting the bell material to the child. Speaking is kept to a minimum in all Montessori presentations in order to allow the child to focus completely without distractions. It is of great importance during any bell presentation that the human voice does not intrude and divert the child’s focus from the pure tone of the bells. When introducing any musical concept keep in mind the need to demonstrate lowest to highest, in preparation for music theory.
Carry Bell
From the bell cabinet select a brown bell by picking it up at the stem with the thumb, second, and third fingers of one hand, and immediately placing the palm of the other hand underneath the base of the bell. Turn around and walk towards the child carefully carrying the bell. Gently place the bell on a table ensuring that no sound is made in the process. Gesture to the child that you are listening for sound and then shake your head to indicate there is no sound to be heard.
Say the word bell and explain to the children that fingers and hands do not touch the shiny metal part of the bell, only the stem and base. Gently pick up the bell and return to the bell cabinet taking care to return the bell to its original place on the green boards.
Mallet
Return to the bell cabinet and select the mallet by picking it up with the thumb, second, and third fingers of one hand, and immediately placing the palm of the other hand underneath the head of the mallet. Walk to the single bell and gently place the mallet on the table beside the bell. Say the word mallet.
The next step is to strike the bell with the mallet. Ensure the child is holding the mallet in a vertical position and it is swinging freely when striking the bell. Acknowledge the beautiful sound and continue to listen until the sound has softened and is eventually inaudible. Repeat this process and invite the child to take a turn.
Strike and Silence
The damper is now presented in the same manner as the mallet. Pick up the mallet and hold it in a suspended position with one hand. Pick up the damper and hold it horizontally with the other hand. Strike the bell with the mallet, acknowledge the beautiful sound, and with the other hand stop the sound by lifting up the damper and pressing the felt end of the damper to the lower edge of the rim of the bell. Indicate to the child that you are listening for a sound and there is only silence. Repeat this process and invite the child to take a turn. Ensure the child is holding the damper with the felt side facing upwards. Pick up the damper and mallet and return to the bell cabinet and then gently pick up the bell and return to the original place on the green boards.
Matching Pitch
As with all Montessori didactic materials the bells are aesthetically pleasing to the child with a powerful presence that attracts each and every child who wishes to explore these shiny bright musical bells. Just as the child learns to recognize colors, forms, and sounds, they also learn to recognize matching notes. The child works alone with the bells, as they would with colors or geometric forms, and the appreciation of sound develops spontaneously. The Montessori bells offer the rare opportunity to produce and listen to a single note, which is of great interest to the young child.
Bells
Bells made of other materials can also produce interesting sounds. For example, the garden variety terracotta pot is made from clay and produces a different sound to that of the Montessori bells which are made from metal. Children take great delight in making these bells.
The Montessori didactic bell materials teach the child to observe, compare, and classify differences in the most varying sensations of sound. They are the means of educating the ear in regard to the pitch of sound. The musical bells are used to strike and match and, later, to grade and convey tone and pitch. The notation materials teach the child to move musically from the concrete to the abstract, and the ability to read and recognize music without the presence of sound.
Pause and Practice
- Hot Cross Buns Song Tips (39 seconds)
- Hot Cross Buns Song (32 seconds)
Now it is your turn to work with the bells. Take a few moments to watch the videos, practice the introductory sensorial bell presentations, and reflect on how and when you might use these in your Montessori classroom.
The next series of blogs will start with the song Hot Cross Buns (Mi, Re, Do) to teach further lessons on the Montessori bells. For the full program please visit Montessori Mozarts and download your own individual professional development course and certification of completion.