Homemade Gift Giving: Involving Children in Holiday Traditions

The holidays are a great time to foster a child’s independence, encourage their creativity, and ignite a spirit of giving back to others. So many of the practices and traditions taking place during this special time of year offer opportunities for children to be involved in meaningful, engaging work that helps to foster connections to loved ones and to the celebratory spirit of the season.
A great way to involve children in holiday traditions is to invite them to participate in the entire gift giving process. Encourage them to think about who they would like to show their appreciation and love to and what that person might like to receive as a gift.
Here are some low cost gift ideas children can help make to show their love and appreciation for special friends and family:
Making a Card
Many families send cards to friends and family members to wish them a special holiday season. Involve your child in this process. Let them make some cards themselves, drawing pictures and writing well wishes to their loved ones.
Materials: Paper, scissors, glue, pencil/pen/markers/crayons/colored pencils (Optional: envelopes, stamps, list of addresses for family and friends)
Ages: 3+ (younger children may need support writing a message or their name, but can certainly draw a picture)
Instructions
- Gather the necessary supplies with the child.
- Offer the child a selection of colored paper and writing utensils.
- Ask them to draw a picture and/or write a message to a loved one. Having a sample card may be helpful for younger children where common phrases such as “Happy Holidays” or “Seasons Greetings” are displayed.
- Ask the child to sign or write their name on the card.
- For older children, providing access to envelopes, stamps, and a list of addresses can also allow them to complete the process by placing their card in an envelope and preparing it to be mailed.
To support the child’s independence with this activity, allow them to help in gathering the necessary supplies; let them choose the paper and their writing utensils. Show older children where the envelopes, stamps, and list of addresses are or have them already gathered for them to encourage self-sufficiency. Allow the child the freedom to decorate their card as they wish. For younger children, ask them if there is a common phrase they might wish to include before they begin decorating and provide them with a sample of this written phrase for them to copy.
Baking Cookies
Everyone loves a sweet treat during the holiday season. Inviting the child to participate in this exciting Practical Life activity is not only a great way to promote their fine motor skills and independence, it is also a fun way for them to make a special gift for a friend or family member.
Materials: ½ cup butter, ½ cup granulated sugar, ¼ cup brown sugar, 2 teaspoons vanilla extract, 1 large egg, 1 ¾ cups all-purpose flour, ½ teaspoon baking soda, ½ teaspoon kosher salt (or ¼ teaspoon table salt), 1 cup semisweet chocolate chips, large bowl, baking sheet, medium cookie scoop/large spoon, microwave, oven, spoon/whisk, measuring cups
Ages: 2+ (even very young children can help with basic food preparation tasks such as mixing and pouring)
Instructions
- Preheat the oven to 350 degrees Fahrenheit.
- Microwave the butter for about 40 seconds. The butter should be completely melted, but shouldn’t be hot.
- In a large bowl, mix butter with the sugars until well-combined.
- Stir in vanilla and egg until incorporated.
- Add the flour, baking soda, and salt.
- Mix dough until just combined. Dough should be soft and a little sticky, but not overly sticky.
- Stir in chocolate chips.
- Scoop out 1.5 tablespoons of dough (medium cookie scoop) and place 2 inches apart on the baking sheet.
- Bake for 7 – 10 minutes or until cookies are set. Cookies should be puffy and still look a little undercooked in the middle.
For children who enjoy being in the kitchen and baking, cookies are just the beginning! They could also make brownies, hot chocolate, apple cider, and so many more delicious treats to show their gratitude and love to friends and family during the holiday season. Be sure to be mindful of any dietary restrictions or allergies if you plan on sharing the sweet treats with loved ones.
To support the child’s growing independence with this activity, it can be helpful to include them in gathering and preparing the ingredients. For younger children, read through the ingredient list and ask them to help find them in the kitchen; for older children, have them read the ingredient list independently and gather the necessary supplies. This same process can be applied while going through the recipe. The adult can read each step to the young child, allowing them to independently perform tasks including stirring, pouring, and measuring (to the extent possible); the older child can read each step of the recipe and perform the tasks on their own.
Making a Scrapbook
Pictures are a perfect way to capture special moments. With a few photos, some creativity, and a little time, children can create a memory for a loved one that will last a lifetime!
Materials: Pictures, printer (if needed to print out pictures), paper (varying colors, patterns), glue, markers, scissors, decorative elements such as gems/pom poms/etc. (optional)
Age: 6+
Instructions
- Gather necessary materials with the child.
- Invite the child to create their own scrapbook page by selecting a piece of paper and then cutting, arranging, and gluing pictures on the page.
- Invite them to use their creativity using decorative elements and markers to embellish the page.
To support the child’s independence with this activity, allow them to help in gathering the necessary supplies; let them choose the pictures they wish to include and the patterns or colors of paper. Another option would be to have materials prepared ahead of time (including a variety of printed photos), allowing the child to be as self-sufficient as possible as they select which they wish to use for their project. Showing older children where to find the photos on a computer and how to print them and providing them time to do so on their own is a great way to support their growing autonomy.
Painted Rock Paperweight
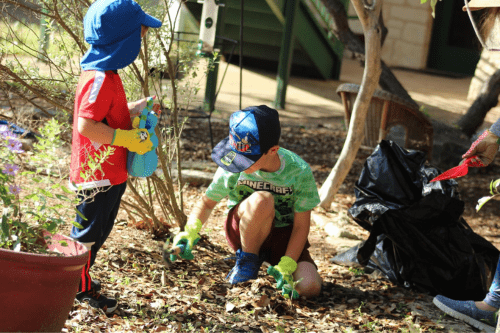
Crafting with items found in nature is a great way to keep the cost of gift giving low and a lovely way for children to explore the natural world around them. Painted rock paperweights make the perfect gift for any adult!
Materials: Rocks, acrylic craft paint, paintbrush, craft varnish/sealer (optional), apron (optional), water, cup
Age: 2+
Instructions
- Take a nature walk with the child to collect rocks in the neighborhood. Larger rocks are more ideal for younger children.
- Gather the other necessary supplies with the child. Pour a small amount of water in a cup for the child to wash their paintbrush when needed.
- Invite the child to paint their rock. Allow the child to continue until they have added as many colors as they would like and they announce they are finished.
- Let the rock dry.
- Optional: When the rock is completely dry, brush on a coat or two of craft varnish/sealer to really make the colors pop.
A great way to support the child’s growing independence with this activity is to allow them to guide the nature walk. Follow their lead, allowing them to choose the rocks they feel would be best. Once back at home, preparing the materials ahead of time or involving the child in this process can help ensure their self-sufficiency. Just as with any creative endeavor, offering the child the freedom to decorate their rock as they wish is a great way to support their creativity (and autonomy).
Yarn and Pipe Cleaner Trivets and Coasters
For the older child who loves to craft, these trivets and coasters make an awesome gift. Better yet, the child does not even need to know how to crochet, braid, or sew to make them, ensuring they are capable of making these gifts all on their own!
Materials: Pipe cleaners (7+ depending on the size of the trivet/coaster being made), yarn (the thicker the yarn, the thicker the triver/coaster and the quicker the project will go), glue gun, scissors, wax paper or cardboard, hairdryer (optional)
Age: 6+
Instructions
- Gather the necessary supplies with the child.
- Wind the yarn around the pipe cleaner, leaving the first ¼ inch of the pipe cleaner bare. Bend and pinch this piece to secure the yarn.
- Trap the tail of the yarn in place while winding it around the pipe cleaner. Keep the wrapping/winding relaxed. The trivet/coaster will be thicker and work up more quickly than if the yarn is wound tightly.
- Before reaching the end of the pipe cleaner, add a second one by twisting the ends together tightly. Continue wrapping over the twisted piece and carry on. Repeat this process every time a new pipe cleaner is added until the desired length is reached.
- Leave an eighth of an inch of the last pipe cleaner bare and snip the yarn, leaving a short tail. Bend the end of the pipe cleaner over the tail and pinch it in place. The project will now look like a long length of woven rope.
- Protect a flat work surface with a piece of wax paper or cardboard before beginning to glue.
- Place the rope of pipe cleaners on a flat work surface. Begin coiling the pipe cleaner. Every couple of inches, dab a thin line of hot glue along the edge of the coiled pipe cleaner and press the new couple of inches of pipe cleaner into it. Hold this piece for a few seconds while the glue cools. (**Young children will likely need help with this step or should be carefully monitored for safety.)
- Continue to coil and glue the pipe cleaner rope until reaching the end to form the trivet/coaster.
- If some of the glue squeezes through to the surface of the trivet/coaster, it can be removed by snipping away the blobs of glue with scissors. Fine strands of glue will vanish if quickly blasted with a hairdryer.
As with many of the other activities, preparing the materials ahead of time or involving the child in this process can help promote their self-sufficiency. Since this project is geared towards older children, providing them with a list of materials and asking them to gather them on their own would be a great way to support their growing autonomy. Since this activity is a bit more complex than some of the others, the video tutorial could also be used as a model for older children to follow, allowing them to complete the craft without the need for support or guidance from an adult, providing them complete ownership.
Adults can become so focused on the busyness of the holiday season. Inviting children to participate in the special practices and traditions of this time of year such as gift giving allows them to be engaged in purposeful work that promotes their sense of independence and pride. These meaningful activities allow them to show their love and appreciation for those most important to them—now that is an amazing holiday gift!
About the Author
 |
Heather White, EdS, is a Montessori in-home teacher and nanny, a Montessori educational consultant for the Andrew’s Institute, a Montessori educator for adult learners, and a volunteer moderator for the Montessori at Home 0 – 3 Facebook page. Formerly, she was a Montessori teacher, Lower Elementary coordinator, and associate head of school. She also has experience as a School Psychologist intern. She is AMS credentialed (Early Childhood, Elementary I). Contact her at hpratt@stetson.edu. |
Interested in writing a guest post for our blog? Let us know!
The opinions expressed in Montessori Life are those of the authors and do not necessarily represent the position of AMS.